|
Command Activation
| w |
Qualify→Stylus Manager |
Not Assigned |
| Keyboard |
Main Menu |
Toolbar |
Definition
Re-Qualifying a stylus updates the current stylus with a new size and
MCS location. Re-Qualification has two main functions, to validate the
current size and location of your qualified stylus, or to reposition the
current stylus during the inspection process using a manual indexing
friction probe.
The use of the Re-Qualify command as a validation tool is useful when
it is necessary to perform checks on your stylus database. These
validation tests would look for damaged probes, worn stylus balls,
movement of stylus clusters or any other abnormal conditions that can
adversely affect your inspection results. You may want to create a
Re-Qualify Stylus part program which will report and update changes in
size and location of the stylus.
Re-Qualifying during the inspection process can be used to extend the usefulness of a
friction style articulating probe head such as the Renishaw PH1 or PH8.
The Re-Qualification process can be done manually on a single stylus,
or as part of a motion program which can automatically update the size
and MCS location of all attached styli.
One limitation of using a friction style probe head is that you can not
return to the same articulated position with any degree of accuracy.
Geomet allows the various positions of the probe head to be used in the
part program without establishing new coordinate systems for every
qualified stylus. This can be accomplished by following these basic
steps.
Assuming we are starting with no current stylus qualified, we will qualify the first
position for your inspection using the Stylus Manager as defined in
Qualifying
a Stylus. This will become Stylus Number 1 in your Probe and Sensor Database.
Do not move the stylus, but qualify it again at the same location which becomes
Stylus Number 2. You can also use the
Duplicate
Stylus command to create Stylus Number 2.
Start your inspection with Stylus Number 2 as the active stylus. Do not start your
inspection with Stylus Number 1. Proceed measuring features until it is
required to articulate the probe position. Reposition the probe and perform a re-qualify,
<Ctrl + w>, on the current stylus number 2. You will be prompted to capture data
points on the reference sphere. Once this operation has been completed, you can return to
inspecting new features without any loss of position. This re-qualify step becomes part of
your part inspection and during a program run, you will be prompted automatically.
This can be done to Stylus Number 2 as many times as required to compete your
inspection. Since Stylus Number 1 was not changed, all styli starting with number 2 and
beyond can be used and re-qualified many times.
Should you have moved Stylus Number 1 and performed a re-qualify on it, all
known locations would have moved. This includes established Part Coordinate Systems. The
Stylus Database retains the reference sphere location in the MCS based on stylus number 1.
All Part Coordinate Systems also are referenced to the MCS. Moving stylus number 1 will
cause PCSs to move.
Note: This process can also be used when it is necessary to change styli on the probe
head. For example, you are required to install a stylus with an extension, or install a
small diameter stylus for use on selected features in your inspection.
TIP: When you want to rotate the probe head, or change the stylus to
another size, press the space bar which will "Disable" the probe preventing data
points from entering Geomet. When you have completed the change, press the space bar again
and your probe will enable.
Cautions:
Care should be taken when performing a Re-Qualification using a manual CMM. The
qualification process relies on the XYZ offset from the CMM
Home position for location of the reference sphere. That position is
assigned to stylus number 1.
When you qualify the first stylus, Geomet retains the location based on the center of
the reference sphere in the Machine Coordinate System (MCS). The MCS has an origin point
(X=0.0, Y=0.0, Z=0.0) that has been established either as the power on position for manual
CMMs or the
Home position for DCC CMMs. It is possible to
have an established Home position on some manual CMMs that has that option installed.
Additionally, Re-Qualification assumes the reference sphere has not been moved. If the
reference sphere has been moved, the Geomet function [Recover→Ref Sphere]
should be done.
Stylus Relationships
Stylus number 1 is considered the origin position for the entire stylus database. The
relationship between any stylus and stylus 1 is the MCS offset value in XYZ values. This
offset is applied in calculations when measuring features. By knowing this offset value,
Geomet can measure a single feature with multiple probe tip locations.
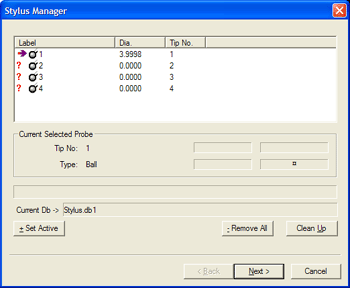
Therefore, when Re-Qualifying stylus number 1, all other stylus in the database will be
marked as "Pre-Qual", as shown in figure 1,
see Example below.
 |
|
figure 1, Pre-Qual Status |

As shown above, all Stylus starting at number 2 and higher are marked with the Pre-Qual
symbol ( ? ). To update the Pre-Qual size and MCS location of each stylus marked as
Pre-Qual, highlight the stylus and press the <Next> button.
Re-Qualifying an Existing Stylus
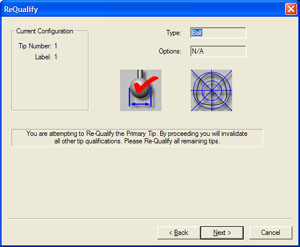
When you start the Re-Qualification process, the first step will show you the previous
stylus definitions, see figure 2.
 |
|
figure 2, Re-Qualification Step |
For example, if stylus number 2 was a ball
style when created, this step will show "Ball" in the Type control and you will
not be allowed to change it. Press the <Next> button to proceed to the next
operation.
The next step will depend on the hardware attached to your CMM. As defined in
Qualifying a Stylus, you will be prompted with additional
information such as motorized probe head position or stylus rack position should they
exist on your CMM.
The final step will prompt you to capture the data points required. Once this step has
been completed, the Stylus Database will be updated with the latest size and MCS location
for the selected stylus.
Related Procedures:
Stylus Manager,
Creating
Motion Paths, FCS Manager,
Qualifying
a Stylus,
Develop a Re-Qualify
Program,
Labeling a Stylus,
Deleting
a Stylus,
Duplicate a Stylus,
Stylus db Manager,
Ring Gage
Re-Qualifying,
Choosing a Stylus,
Stylus Edit
Control, Measuring with Multiple Styli
|


