|
Summary
During the inspection process, access to a feature is often limited to
the feature's relationship to the current stylus. For example, if measuring
a through bore that is parallel to the surface plate you will need either a
long probe whose shaft is parallel to the bore and can reach the length of
the bore, or the ability to use multiple styli where you can capture data
points entering the bore from both ends.
Using a styli with a long shaft is not the preferred method due to the
degradation in repeatable accuracy and just the fact that it is harder to
capture data points inside a feature where visibility is often obscured.
By using multiple styli that are positioned to access much of the feature
from different entry points, you can spread the data points over the entire
feature assuring the highest possible confidence on the reported results.
The ideal condition is where you have an articulating probe, such as the
Renishaw MH8 or
PH10T. These probe
heads provide repeatable positioning of the styli without the need to
requalify.
The alternative method is the use of a star cluster that has up to 5
fixed styli attached to a common center. The star configuration can be
positioned in the probe head mount to align the styli to the inspection
fixture.
Procedure
Step 1
In this example, we will measure a through bore that lies parallel to the
surface plate and its axis is parallel to the X-Axis of the CMM. To setup
the styli that will be needed, use the Stylus Manager to
qualify the required positions. We will us two
styli, one pointing in the -X direction, the other in the +X direction.
Step 2
|
 |
|
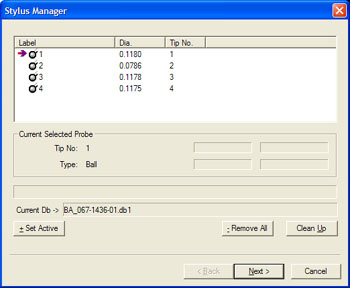
Stylus Manager |
Activate the Stylus Manager and choose the
qualified styli that is orientated toward the -X direction.
Step 3
Select the proper feature to be measured. Here we will use the
cylinder with 16 points. Capture data
points by entering the cylinder from the right side of the cylinder opening.
Spread 8 data points around the full inside surface of the cylinder. When
these 8 data points have been captured, pull the stylus out of the cylinder
an activate the Stylus Manager.
Step 4
The Geomet prompt will still show a cylinder is in progress and that
there are 8 data points still required. When the Stylus Manager is opened
during a feature measurement, you can choose a new stylus and set it active.
Choose the stylus whose orientation is the +X direction and press the
<+ Set Active> button. Geomet will not place a program
statement in the report, but the Current Status banner will update to show
the stylus change.
NOTE: You can use as many qualified styli as needed to measure a
single position. The styli being chosen must be the same probe diameter.
Step 5
Capture the remaining 8 data points on the cylinder from the left
opening. When all data points have been captured, Geomet will report the
cylinder as a single feature.
NOTE: If you are using a DCC style CMM, make sure you have included
the necessary IPs between styli changes to provide safe movement during
automatic inspections.
Related Procedures:
Stylus Manager,
Deleting Styli,
Labeling Styli,
Duplicate a Stylus, Stylus db Manager,
Stylus Edit Control
|


