|
Command Activation
| Ctrl + Alt + w |
Qualify→Stylus db Manager |
| Keyboard |
Main Menu |
Definition
The Stylus db Manager provides tools to access more than 1 stylus database. Through
the use of separate stylus database files, you can build specific stylus configurations
based on your inspection needs and keep your stylus database manageable.
For example, it is not necessary to build one large stylus database that covers
all your part inspection needs. It is also not efficient to clear out and build the stylus
database with every unique part inspection. Therefore, Geomet can maintain separate stylus
database files assigned to a part inspection.
The Stylus db Manager performs a test to a part program file when it is opened. This
test looks for the original stylus database in use when the part program was created and
compares it against the current stylus database in use,
see
Loading a Part Program.
The default name Geomet uses for the stylus database is Stylus.db1 and it
is located in the Geomet program folder:
C:\Program Files\Helmel Engineering\Geomet 101
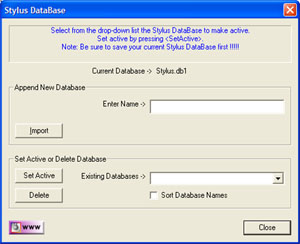
The Stylus db Manager
 |
|
figure 1, the Stylus db Manager |
The Stylus db Manager provides the tools to:
Geomet maintains a listing of available Stylus database files in the Windows Registry
under the Geomet 101 key. Only the Stylus db Manager should be used to control the editing of
these entries to the registry.
To create a new stylus database, the <Append> function is used. In figure 1, the
stylus database "new.db1" is the current stylus database in use. To create a new
database and set it active, enter the new name for the database in the controls
"Enter Name ->". This example we will use "Left Bank",
note: it
is not necessary to add ".db" to the file new name name.
Press the <Append> button and the current database will be copied and given the
name "Left Bank.db1". The Stylus db Manager will update the registry and set
"Left Bank" as the new active stylus database.
The Import function allows you to copy and register an existing stylus database in
Geomet. For example, should you have more than 1 CMM and require matching stylus
databases to be used for both CMMs, you can create the stylus database on CMM #1
then copy
it over to CMM #2.
 |
|
figure 2, Importing a stylus database |
Once the stylus database has been copied to the correct location on CMM
#2, see the current file location located in
System Options, press the
<Import> function and the file
navigation tool will display, see figure 2. Locate the copied stylus database and
select <Open>. Geomet will add this database to the registry and set it active.
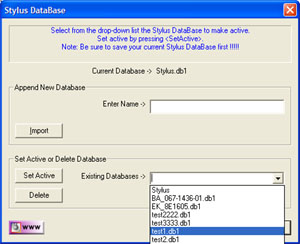
The process of deleting a stylus database will remove the listing in the registry. This
will not delete the actual file. Geomet will no longer see the file.
 |
|
figure 3, Selecting a stylus database |
To delete a stylus database from use in Geomet, drop down the list of files in
the "Existing Databases ->" control, see figure 3. In this example,
we will choose "New2". To complete the delete process, press the
<Delete>
button.
Should you try to delete the current stylus database in use, the Stylus db Manager will
default to "Stylus.db1" as the new active stylus database.
To manage what stylus database is to be used, drop down the list of files in the
"Existing Databases ->" control, see figure 3. Locate the database
to be set active and press the <Set Active>. Geomet will now display and use the
stylus configurations from this file in your inspection report.
When you change stylus databases it is a good practice to re-qualify the individual
stylus tips. This should be done if you are not sure other changes have been made such as
re-mounting the probe head or changing stylus tips associated with different
configurations of a particular stylus database.
NOTE: You should not switch the stylus database during a part inspection. This can
cause loss of accurate data.
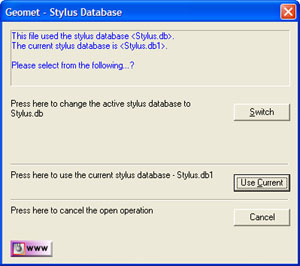
When a part program is loaded, Geomet will perform a test to verify that the current
stylus database matches the stylus database used when the part program was created. Should
Geomet find that the part program requests a stylus database that is different than the
current stylus database, one of two warnings will appear.
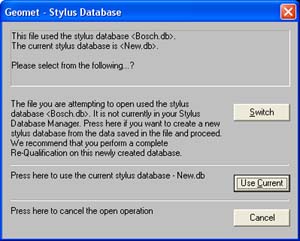
 |
|
figure 4, Activate the Stylus Database |
Warning 1 - Switching Stylus Database
The first test looks for a match using the stylus database embedded in
the part program with the current active stylus database. If they do not
match, then it checks the list of available stylus databases found
registered with Geomet. Should a match be found Geomet will display the
available options, see figure 4. There are three choices
available:
Switch - Sets active the stylus database referenced in the part
program.
Use Current - Continues opening the part program using the current
stylus database.
Cancel - Aborts the opening of the file.
Warning 2 - Embedded stylus database not found
In this condition, the stylus database embedded in the part program is not found to be
registered with Geomet. This condition can happen when a previous stylus database has been
deleted through the Stylus db Manager, or if the part program was copied over from an
archive or another CMM.
 |
|
figure 5, Missing stylus database |
As shown in figure 5, a warning is shown that the part program references a
stylus database that is not registered in Geomet.
Switch - Part programs contain a copy of the original stylus database
when it was first taught. This database information can be extracted to create a new
database. Select <Switch> if you want to create a data stylus database file and set
it active. In this condition, it is recommended that a re-qualification be done to ensure
accuracy.
Use Current - Continues opening the part program using the current
stylus database.
Cancel - Aborts the opening of the file.
Related Procedures:
Stylus Manager, Open File,
Default File Locations
|


