|
|
|
Command Activation
| F9 |
System→System Options |
 |
| Key board |
Main Menu |
Toolbar |
Definition
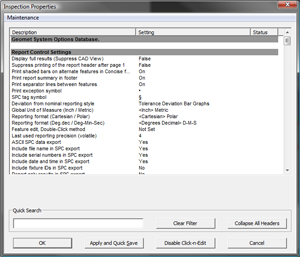
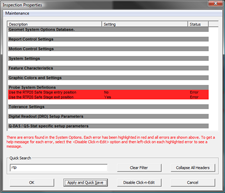
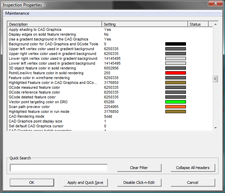
System Option provides access to all configuration settings for Geomet.
These settings control the behavior of Geomet and is the one
source for all feature control. The System Options is divided into Headers
for better grouping of common tasks and settings,
see
figure 1.
 |
|
|
|
figure 1, System Options Home Page |
|
| |
Collapse / Expand All Headers
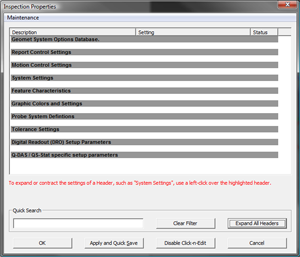 The System Options data
list contains hundreds of settings broken down into common sections, or
Headers. When the System Options is first
launched, all headers are expanded showing all associated settings. The System Options data
list contains hundreds of settings broken down into common sections, or
Headers. When the System Options is first
launched, all headers are expanded showing all associated settings.
Searching for a single setting can be a daunting
task if you are to search through every header, one at a time.
One method to reduce individual settings is by
left-clicking on the button:
<Collapse All Headers>
All settings associated to a Header will
collapse leaving only the basic Headers shown. The button you
pressed will change to:
<Expand All Headers>
to provide a return to showing all
settings.
Once the Headers have been collapsed,
you can now view the settings associated to a single Header by
left-clicking on the Header. The left-click is a toggle state
mode. It toggles between expanding and collapsing the settings
associated to that Header.
|
Quick Search Filters
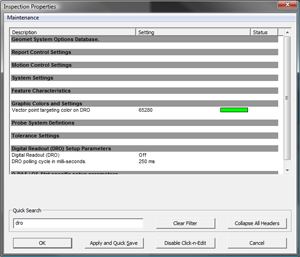 Locating a setting can be quickly done by
entering all or a portion of the setting name into the Quick Search data
cell. Locating a setting can be quickly done by
entering all or a portion of the setting name into the Quick Search data
cell.
As you enter a search term, the System
Options tool automatically reduces the setting being shown to
match your entry. In our example here, the search term "dro" was
entered and the result shows all settings that have the
consecutive letters "dro" anywhere in the setting name.
For all practical use, this is the preferred method to quickly
locate a setting.
To clear the search
term that has been entered, click on <Clear Filter>. |
Changing the Setting Value
 To
change the value associated to any Setting can be done by a simple
left-click. When you left-click on a Setting a change tool will appear.
This change tool will be configured for the type of data associated with
the setting. To
change the value associated to any Setting can be done by a simple
left-click. When you left-click on a Setting a change tool will appear.
This change tool will be configured for the type of data associated with
the setting.
In this example, we show a change tool
that controls the value of the setting as "True" or "False".
All change tools present the current
setting, followed by a range of acceptable values if required.
There is also a option to reset the setting to the Factory
Default. This can be accomplished by applying a left-click on
the button <Set to Default>.
 All
changes made to the System Options, will appear in the list
highlighted in yellow and in the "Status" data column, the text
"Changed" will appear. All
changes made to the System Options, will appear in the list
highlighted in yellow and in the "Status" data column, the text
"Changed" will appear.
|
System Options - Validation and Saving Changes
The System Options tool utilizes a database file with the name
Geomet.gso. This file can be found in the folder where the
Geomet.exe program file is located. The database file can not be edited
with other files tools as it is a proprietary format.
Geomet maintains tools to self-diagnose and repair the gso
database. Should the database become corrupted, the tool will
automatically attempt a recover and if not successful, a new
database is created based on default values. Validations
 Many
setting in the System Options are tested before adding them to
the gso database. Should one of the tested values fail the
validation test, it will be highlighted with red in the list and
the Status column will be tagged as "Error". Many
setting in the System Options are tested before adding them to
the gso database. Should one of the tested values fail the
validation test, it will be highlighted with red in the list and
the Status column will be tagged as "Error".
To view the reason for failure on a specific item, disable the
automatic left-click change tools by pressing the button
<Disable Click-n-Edit>.
Left-click on the red highlight and a
reason for fail message will be displayed. In most cases, the
reason is a result of a relationship between different settings.
An example would be to set the default value for a SPC study at
7, then change the minimum requirement to 9. As individual
settings, these did not fail the validations, only at the time
of closing were they tested.
Apply and Quick Save
While making many changes it is a good practice to save the
changes periodically. Press the button <Apply and Quick
Save> which will validate your current changes and if
no errors are found, it will write the changes to the gso
database. The System Options tool will remain open.
Closing the System Options Tool
 Pressing
either the <Ok> or <Cancel>
button will close the System Options tool. If no changes are
pending, the Cancel option will close the tool immediately.
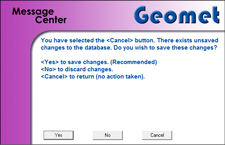
Should there be any pending changes, a message will appear, as
shown here. Pressing
either the <Ok> or <Cancel>
button will close the System Options tool. If no changes are
pending, the Cancel option will close the tool immediately.
Should there be any pending changes, a message will appear, as
shown here.
Pressing the <Ok> button will instruct the
System Options tool to first validate all pending changes and if
no errors are found, will update the gso database and close the
tool. |
|
|
Data Change Types
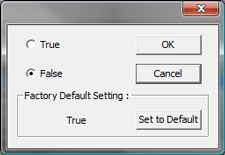
State Change
Some settings require that only a choice between two
values. These values are: On / Off Yes / No True / False
Installed / Not Installed
To change the current setting, left-click on the radio button
next to your selection and press the <Ok> button.
|
Integer or Whole Number Change
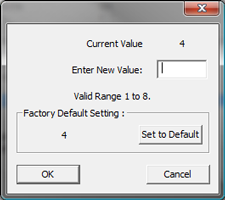 A
large number of settings use integer numbers. Settings such as
decimal place precision, minimum number of data points required
for a feature just to name two. A
large number of settings use integer numbers. Settings such as
decimal place precision, minimum number of data points required
for a feature just to name two. In this
change tool, you will see the current value and the acceptable
range. Enter a new value and press the <Ok>
button. |
Real Numbers
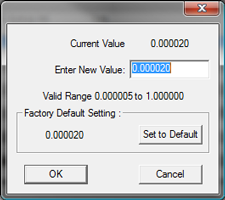 Real
Numbers include all of the measuring numbers with a decimal
place precision. Many setting require the use of Real Numbers.
These include motion parameters, reference sphere size and
tolerance limits just to name a few. Real
Numbers include all of the measuring numbers with a decimal
place precision. Many setting require the use of Real Numbers.
These include motion parameters, reference sphere size and
tolerance limits just to name a few. In
this change tool, you will see the current value and the
acceptable range. Enter a new value and press the
<Ok> button. |
Data Selection
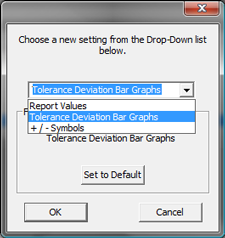 Certain
System Option settings require the selection of preset choices.
To display the available selection, left-click the down arrow
button, Certain
System Option settings require the selection of preset choices.
To display the available selection, left-click the down arrow
button,
 to show the available choices. In the example here, the choice is between three settings:
Report Values Tolerance Deviation Bar
Graphs +/- Symbols The example shows the selection for
"Tolerance Deviation Bar Graphs" has been made.
Highlight the selection and press the <Ok> button. |
Text Entry
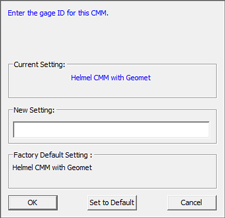 Settings
that require text entry such as messages and identifications are edited
through the use the text editor shown here. Settings
that require text entry such as messages and identifications are edited
through the use the text editor shown here. There
are no validation checks with the text editor. Enter your changes and
press the <Ok> button to set.
|
File Locations
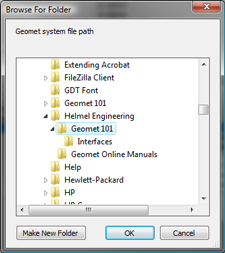 Geomet provides the basic paths required for all
operations, however, you can override these choices on a as-needed
basis. Geomet provides the basic paths required for all
operations, however, you can override these choices on a as-needed
basis. Geomet utilizes a Windows Folder Browser
tool with provides the functionality to navigate your drive and
locate the desired folder. Highlight the folder you wish to set
and press the <Ok> button.
NOTE: Using the Windows standard browse tool does not provide
for a Geomet style set default button. |
System Colors
 Geomet
provides access to many colors used in display, reporting and
graphics. In the System Options tool, all color settings show
the current color as a color swatch, see example. Geomet
provides access to many colors used in display, reporting and
graphics. In the System Options tool, all color settings show
the current color as a color swatch, see example.
|
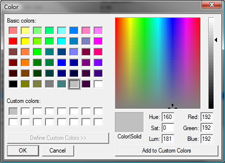 Changing system colors are provided through the use of a standard
Windows Color Selector. Within the color selector there are tools to set
the current color and to create new default colors which can be saved as
a custom color. Changing system colors are provided through the use of a standard
Windows Color Selector. Within the color selector there are tools to set
the current color and to create new default colors which can be saved as
a custom color. To choose a new color there are 3
basic methods: Basis Color: To select one
of these pre-defined colors, left-click on the color of choice.
Color Chart: In the main color area, left-click on the base
color you want to use. Once that has been done, left-click on
the narrow color gradient scale and the color will display in
the Color/Solid sample swath. Enter
Method: If you know the desired color, enter the values directly
in the Red/Green/Blue or Hue/Set/Lum cells.
Commit the change to System Options by pressing the <Ok>
button. |
Add to Custom Colors
Creating and saving custom colors for the System Options setting can be
accomplished using the Color Tool. There are 16 possible custom colors
that can be saved. Geomet always populates the first choice with the
default value.
To create a custom color start by first selecting a cell by
left-clicking on the color cell. By doing this you are instructing the
color tool to place a new color in the cell. NOTE: When you click on a
color cell, that color will first move into the Color/Solid cell and any
color you previously created will be displaced.
The next step is to create the new color using one of the three methods
listed above. When the color has been created, press the <Add to
Custom Colors> button to save the color.
Commit the change to System Options by pressing the <Ok>
button. |
Tolerance Preset Values
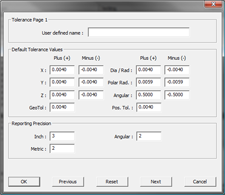 Geomet
maintains several Tolerance Preset Page records. When tolerance is
applied to a feature attribute, you can select which tolerance page to
use. For more information regarding the application of Tolerance Pages,
see Introduction to Tolerance. Geomet
maintains several Tolerance Preset Page records. When tolerance is
applied to a feature attribute, you can select which tolerance page to
use. For more information regarding the application of Tolerance Pages,
see Introduction to Tolerance.
The System Options Tolerance change tool updates many values associated
with the tolerance page. This includes decimal precision depth, All
Bi-Lateral, Uni-Lateral and GDT default values.
On the change tool there are two buttons, <Previous>
and <Next> that moves through the various tolerance
pages. |
| |


