Command Activation
| p |
GeoPlus→Feature Tag |
|
| Keyboard |
Main Menu |
Toolbar |
Definition
Feature Attribute Tags provide tools to customize
printouts and assign feature characteristics for ASCII exporting. The most common use for Tags is to produce
inspection reports that contain only the feature reported values you
require.
Applying Feature Attribute Tags
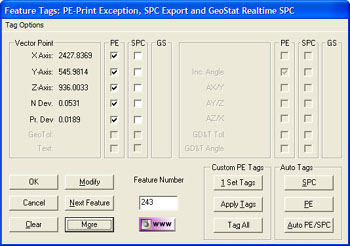
The Feature Tag dialog provides the necessary tools to
assign attribute tags, see figure 1. To activate Feature Tags,
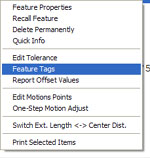
highlight the feature in the inspection report and right-click to activate
the feature sub-menu. Choose <Feature Tag>. Optionally you may use the
keystroke <p> or menu options.
 |
 |
| figure 1,
Feature Tags Main Dialog |
figure 2 -
Right-Click |
The Feature Tag dialog will appear preconfigured to
the highlighted feature. Within the dialog, there are three columns of check
boxes which are defined as:
PE: Print Exceptions. When a check is placed
against an attribute, the Report Control Center will add that feature and
attribute to the printed inspection report. Only tagged features will be
printed allowing control over the printing process. The symbol " • " is
placed next to the attribute in the full displayed inspection report
indicating it has been tagged.
SPC: ASCII Export Control. When a check is
placed against an attribute, Geomet will export this attribute to an ASCII
text file. The exporting process is automatic during an inspection run, or
can be done manually through the drop-down menu selection [File→Export→Export ASCII SPC Data] The symbol "
§ " is placed next to the attribute in the full displayed inspection
report indicating it has been tagged for SPC exporting. The configuration of
the exporting formats is controlled in the System Options.
Feature Tag Buttons
|
Button |
Description |
|
Modify |
Commits the current changes made
to attribute tags to the current record. |
|
Next Feature |
Retrieves the next feature from
the inspection report and displays its current values and
attributes. |
|
Clear |
Clears all flags on the current
feature, commit the changes with the Modify button. |
|
More / Less |
Expands the Feature Tag dialog to
show a slider which can be used to scroll through the features in
the inspection report. |
|
1 Set Tags |
Activates a Feature Tag Default
tool that allows customized default setting for using the one-touch
controls, Apply Tags and Tag All. |
|
Apply Tags |
Applies the attribute tags to the
current, highlighted feature for Print Exception control based on
the default tags set in the Feature Tag Default under 1 Set Tags. |
|
Tag All |
Applies the attribute tags to all
features in the inspection report for Print Exception control based
on the default tags set in the Feature Tag Default under 1 Set Tags. |
|
SPC |
Applies SPC tags to all reportable
attributes on the current highlighted feature. Saves the changes and
moves to the next available feature. |
|
PE |
Applies Print Exception tags to
all reportable attributes on the current highlighted feature. Saves
the changes and moves to the next available feature. |
|
Auto PE/SPC |
Applies SPC and Print Exception
tags to all reportable attributes on the current highlighted
feature. Saves the changes and moves to the next available feature. |
Highlighting Features
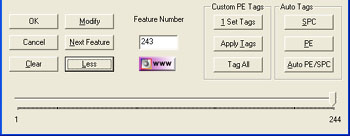 |
| figure 3,
Expanded Feature Tags Main Dialog |
There are several methods to move between inspection
report features while in the Feature Tag dialog. Using the <More> button
will expand the dialog to show a slider control, see figure 3. With your mouse, move the
pointer which will retrieve and display a feature in the tag dialog. If you
want to hide the slider control, press the <Less> button.
Using the keyboard left and right arrows will move the
highlighted feature and update the tag dialog. The left arrow moves to the
previous feature with every press. The right arrows moves forward. You can
also type in a specific feature number in the "Feature Number" control.
The <Next Feature> button behaves the same as the
right arrow. NOTE: Always commit the tags by using the <Modify> button
before moving to another feature.
Auto Tags Group
<SPC>, <PE>, <Auto SPC/PE>
This group of controls provides a single function to add checks for all
attributes of the current selected feature. Using a 3D Point in Cartesian
format as an example, press the <PE> button and two actions will occur. The
first action will place a Print Exception check on the X, Y and Z reported
values. The second action will move the feature pointer to the next feature
available for tags.
Custom PE Tags Group
This group of controls applies a previously defined template of tags that
controls which attributes will receive a Print Exception tag. The
application of this template can be on a single feature, or the entire
inspection report with one action.
<1 Set Tags>
 |
|
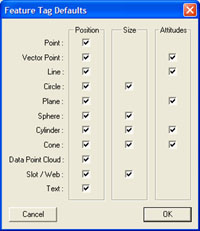
Default Tag Assignment |
This command provides access to the Feature Tag Defaults Tool which is
used to build a Print Exception template shown at right. There are three
selectable attributes for features. These are Position, Size and Attitudes.
The Position column controls the PE flags for X, Y, and Z reported
positions in Cartesian and the Polar-Radius, Polar-Angle in Polar mode.
The Size column controls the PE flags for all reported Width, Radius and
Diameter sizes.
The Attitudes column controls the PE flags for all reported 2D and 3D
projection angles and Normal Vectors of features.
The Feature Tag Defaults Tool can also be started outside of the Feature
Tags tool through the menu [GEO-Plus©→Set
Feature Tag Defaults].
Related Procedures:
Set Feature Default Tags,
Report Control Center,
Report Offsets, Ordered
Reports, Ordered Report Tutorial
|


