This topic covers the usage of the Ordered Report Tool. This tool allows
customization of the standard and Concise printed inspection reports by
allowing the operator to change the order in which the features are
reported.
Providing a means to reorder the printed features allows the operator a
means to group together features that belong to a common section of a
production part, or to enhance clarity when reviewing the final inspection
report.
To review the help topic for the Ordered Report,
click here.
Activating the Ordered Report Tool.
Launching the tool is done through the File drop down menu:
[File→Custom Reports→Report Control Order]
 The
Ordered Report Tool is divided into two sections that show the original
reported features on the left side and the new location in the report on the
right side.
The
Ordered Report Tool is divided into two sections that show the original
reported features on the left side and the new location in the report on the
right side.
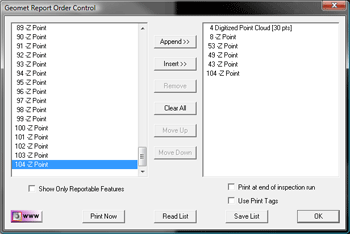
As shown at right, the left side is displaying features 89 through 104 of a
large report. The left side is showing 6 features that are added using the
tools provided. They are not in the original order as measured.
Report Building Tools
Building and managing the ordered report list is accomplished through the
tools Append, Insert, Remove, Clear All, and the Move Up/Down buttons.
Append
The simplest method to building the report order is using the Append
option. Each feature appended is added to the list on the right side by
adding it to the bottom of the list. In the example above, feature number 10
is highlighted and by pressing the <Append> button, a new entry
will be added to the bottom in the right list.
The Append feature is also executed using the left double-click method.
Highlight the feature to be appended using a left double-click that feature
and it will be added to the ordered list.
Insert
 The Insert option allows you the ability to select the location in the
ordered list where you would like to add a new feature.
The Insert option allows you the ability to select the location in the
ordered list where you would like to add a new feature.
Select the location in the right list where you want a new
feature inserted before. Here we selected feature number 49. Now
choose the feature to be inserted in the left list and press the
<Insert> button.
If you do not place the insert marker in the right list,
the insert command behaves like the append command by adding the selected
feature to the bottom of the right list.
Remove
As the name implies, this command will remove from the
right list the selected feature. Only one feature can be removed at a time.
Clear All
To remove all entries in the right list, the
<Clear All> command is used.
Move Up / Move Down
to reorder the entries in the right list the commands
<Move Up> and <Move Down> can be used.
Highlight the feature to move in the right list and press the corresponding
direction you want the feature to move.
Save List
The building of the list is the first step when creating
an inspection program. Should you want to save the list and recall at a
later time, or create an inspection step that will automatically print an
ordered report, you should save the list. This operation will add a numbered
list to the inspection database that corresponds with the right list order
you created.
Read List
You can save one numbered list in the inspection database
for each inspection program. When you open the Ordered Report tool, it will
first check if there is a numbered list in the database and display that
list for printing or editing.
HINT: Should you want to create a one-time ordered report,
press the Clear All command and build your new list. Process the list by
using the Print Now option. When you close the Order Report tool, you will
be prompted to save your changes. Select No, and your original numbered list
will remain in the database.
Print at end of inspection run
Once you have created the Ordered Report, you can elect to
have it automatically acted upon at the completion of an inspection run.
Place a check next to this option and a new inspection feature will be
created and appended to your inspection report. This new feature can be
identified as "Print out Ordered Report".
When the automatic print feature has been added to the
inspection report, you can easily access the Ordered Report tool by
highlighting that feature and right-click with your mouse.
To remove the automatic printing feature from your
inspection report, activate the Ordered Report tool and uncheck the option.
The tool will locate the automatic printout step, delete it from the
inspection report and renumber your inspection report.
Use Print Tags
This option configures the printing characteristics of the
automatic print and print now features. When checked, and when your
inspection report is set to printout only items that have previously been
tagged for printing. Then the ordered report tool will filter only those
attributes within a feature that have the
Print Exception tags applied.


