|
Introduction
The Custom Ordered Report allows the operator to
control the printing sequence of features within Geomet 301. For
example, the report may be constructed to place similar features
together, without regard when they were originally added to the
inspection report. In normal reports, the features are printed in the
same order they were added to the inspection.
Building the Ordered List
Once the inspection has been completed, the
operator can then activate the Ordered Report tool. This can be
accomplished from the main drop down menus:
[File→Custom Reports→Report Control
Order]
The report organization tool will appear as shown
in figure 1.
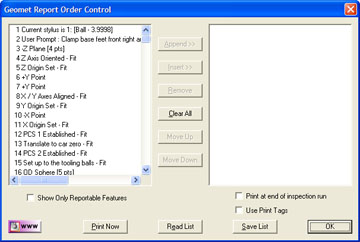 |
| figure 1, Report Control Order |
This tool is organized into a
selection list of the current inspection on the left side, and a
ordered list found on the right side.
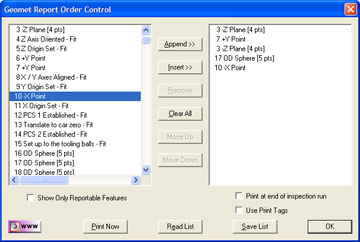 |
| figure 2, Report Control Order Display |
To add a feature to the display
list, highlight that feature in the left list and press the Append >> button. For example, feature number 75 is highlighted
in the left list and once the Append button is pressed, it copies to
the right list on the bottom, see figure 2. An optional
method to append an entry to the ordered list is to highlight the
feature in the left list, then double-left click with the mouse.
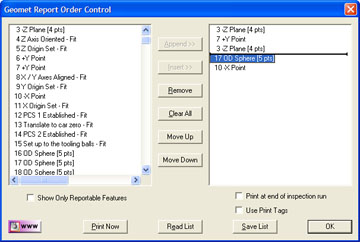 |
| figure 3, Report Control Order
Insert Option |
To add a feature at a specified
location in the ordered list can be accomplished by using the Insert
command. To perform an insert, highlight a feature in the right
list, which will add the insertion mark between the highlighted
feature and the previous feature, see figure 3.
To complete the insert, select a
feature from the left list and press the Insert >> button.
After the insert has taken place, the highlight and insert mark will
clear from the right list. When there is no insert mark displayed,
the insert command will act similar to the append command.
To remove an entry in the right
list, highlight the feature and press the <Remove> button.
This command will clear all
entries from the right list.
These commands repositions the highlighted
feature in the right list Up or Down one position.
The ordered list can be saved to
the current inspection by selecting Save List. The saving of the
list is important should you want to print the report directly from
the inspection process during a part run. By default, the ordered
list is not saved with the part inspection.
Pressing this button will read
into the right list the previously saved listing.

When checked a program step is
added your inspection report to automatically build and print the
ordered report. Only one ordered report can be added to the
inspection report.

This check works with features
that previously have been tagged for custom printing using the Print
Exception function. The setting of this option is saved with the
record. It works with the Print Now and Print at End of Inspection
functions.

This command will print an
ordered report based on the current displayed list. For example, you
may have a saved ordered list, but you require a new list to print
just a few features. Clear the right list <Clear All> and build a
new list. Press Print Now and Geomet will print a new report on
demand,
see example.
|


