Introduction
 When
using the EZ Launch Polling Service with a script file, There are additional
steps required to configure the service. To launch the EZ Launch Setup
screen, locate in the main menus: When
using the EZ Launch Polling Service with a script file, There are additional
steps required to configure the service. To launch the EZ Launch Setup
screen, locate in the main menus:
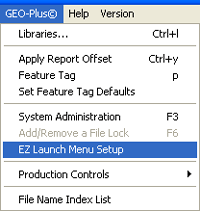
[GEO-Plus©→EZ Launch Menu Setup]
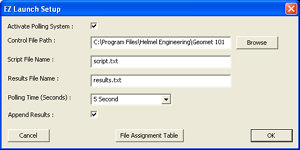
Within the setup screen you will enter:
- Polling Time
- Results File Name
- Script File Name
- Control File Path
- Activate Polling System
 Polling
Time: Select from the drop down control an appropriate cycle in seconds
that the EZ Launch will go out and look for the script file. Under most
conditions, 5 or 10 seconds will suffice most applications. Polling
Time: Select from the drop down control an appropriate cycle in seconds
that the EZ Launch will go out and look for the script file. Under most
conditions, 5 or 10 seconds will suffice most applications.
Results File Name: Normally data that is tagged for saving to an
ASCII export is saved in a data file with the name of the inspection program
+ ".TXT". You can export all data into one common file by entering a data
file name in the Results File Name field. Then when the inspection proceed,
each inspection program will export all tagged data into one common file.
Script File Name: Here you would provide a full file name for the
script file that the polling service would look for. The file name should
contain the extension. For example "script.txt". To see how the script file
working in polling mode, please review
Polling Service.
Control File Name: Enter the complete path name, or use the
<Browse> option to locate the sub directory, or folder, where the script
file and results file will reside. The path should include the drive and
folders, example: C:\My Documents\Geomet 101
It is not important that the path points to a folder on the local Geomet
system. You may use network drives closer to the service where the script
files would be generated.
 Activate
Polling System: This check will activate the Polling Service inside EZ
Launch Menus. It should be noted that the Polling Service only works with
Fixture Base Definition #1. Activate
Polling System: This check will activate the Polling Service inside EZ
Launch Menus. It should be noted that the Polling Service only works with
Fixture Base Definition #1.
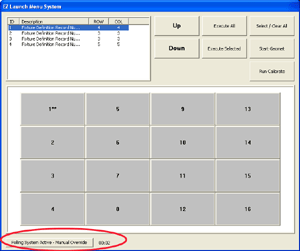
In the example shown here, we have the first Fixture Base Definition
selected and then in the lower left section of the menu, a timer is
displayed along with a Enable / Disable Polling Service button.
For more detailed explanation on the Polling Service, please see
Polling Service.
 The
File Assignment Table lists all inspection programs you want to use as part
of the monitoring program. Each inspection program will be assigned a number
that is used in column 3 of the script file. The
File Assignment Table lists all inspection programs you want to use as part
of the monitoring program. Each inspection program will be assigned a number
that is used in column 3 of the script file.
For example if the assigned inspection index was:
Index Number 2 correlates to the part program
“Widget.GMT”
Index Number 3 correlates to WidgetOp20.GMT”
and the script file looks like:
1, 0001, 2
1, 0001, 3
2, 0002a, 2
3, 0003, 2
4, 0004b, 2
5, 0005, 2
6, 0006a, 2
7, 0007, 2
Geomet would cycle through 8 complete inspections on 7 parts located in
cradles 1 through 7. On cradle 1, we would cycle Widget.GMT, then
WidgetOp20.GMT followed by Widget.GMT moving from Cradle 2 to Cradle 7.
The polling service matches the data in column 3 against a lookup table
to identify the inspection program being requested. To build this lookup
table, use the File Assignment Table function.
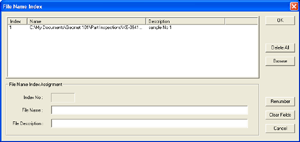
Building the File Name Index Table
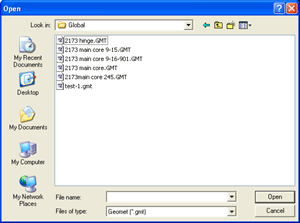 To
add files to the File Name Index tool, press the <Browse> button and
locate your file in the appropriate directory. Press <Open> and you
will return to the File Name Index window and the file will be inserted in
the control labeled File Name: To
add files to the File Name Index tool, press the <Browse> button and
locate your file in the appropriate directory. Press <Open> and you
will return to the File Name Index window and the file will be inserted in
the control labeled File Name:
At this time you can enter a description for this file which is used for
easy recognition.
The Index File number will be automatically assigned. To add this record
to the File Name Index database, press the <Add File> button.
Delete All: As it sounds, this will delete all entries in the File
Name Index database.
Delete File: When you have a single entry highlighted, the <Delete
File> button becomes available. Pressing this will remove the file from the
database. The index number you remove becomes unavailable unless it is the
last number in use.
Update: When you have a single entry highlighted, the <Update>
button becomes available. This is used to change the file description field,
then update the database.
Renumber: This command will renumber the database. Care should be
used when you renumber a database, as it will affect any script files you
have already built.
Clear Fields: Empties the three control fields.
To accept all the changes, press the <OK> button.
Related Procedures:
Fixture Base Definitions,
Cradle Definitions,
Global Names, System Options, File Name Index
Table, Global Name Assignment,
EZ Launch Tutorial
|


