|
Maintenance Operations
Geomet provides access to the Stylus Rack for Maintenance Operations and
for use during an inspection through the Stylus
Manager. Each method has unique capabilities in the operation of Geomet.
The Maintenance mode is primarily used to test the rack, change assigned
locations, clean styli or replace damaged styli. It is important that the
modules are not placed into the bays by hand. Each module must be aligned
accurately to allow the probe head to reseat the module.
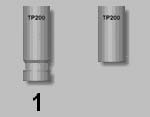
On each module, there are three unique symbols that must correspond to the
same symbol on the probe body.
|
 |
|
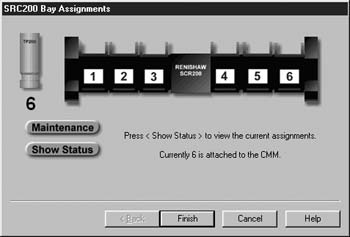
figure 1, Stylus Rack
Maintenance Mode |
Activating Stylus Rack Maintenance Mode
To start the Maintenance mode press <Alt + w> on the keyboard. From this
dialog you can control the operations of the Stylus Rack outside of part inspection
programs.
 This
graphic shows a Touch Probe and the current status of the module. The graphic on
the left indicates that the module assigned to bay number one is attached to the
touch probe. The graphic on the right indicates that no module is attached to
the touch probe. You have the ability to change the module assignment by left
clicking on the graphic of the touch probe, which will remove the module. Please note that this will not perform the motion to park the module into the
assigned bay, this will only remove it and its reference from Geomet. This
graphic shows a Touch Probe and the current status of the module. The graphic on
the left indicates that the module assigned to bay number one is attached to the
touch probe. The graphic on the right indicates that no module is attached to
the touch probe. You have the ability to change the module assignment by left
clicking on the graphic of the touch probe, which will remove the module. Please note that this will not perform the motion to park the module into the
assigned bay, this will only remove it and its reference from Geomet.
This manual adjustment should only be used under certain conditions such as
removing all bay assignments. The two buttons shown
<Maintenance> and <Show Status> provide additional functions when selected.
Maintenance
This function will allow you direct access to performing motion in assigning
and pre-loading Stylus Rack bays
|
 |
|
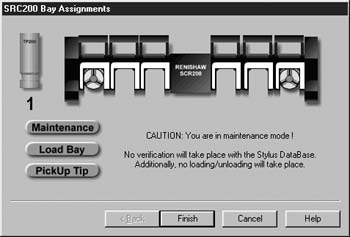
figure 2, Stylus Rack Open
with Modules |
When <Maintenance> has been selected the visual appearance of
the graphic changes to show you the current status of the bays. Two additional
buttons will appear <Load Bay> and <Pickup Tip>. These control the CMM
operations in accessing the Stylus Rack bays.
Change Bay Assignments without CMM Control
To attach or remove a module
in a bay without performing motion left click of the
bay graphic. For example to add a module to bay number two, left click on bay
two and a module will appear. To remove that module, left click on the module
and it will disappear.
Load Bay under CMM Controls
To load a bay under CMM control, select the button <Load
Bay> followed by a left click on the bay to load. If it is empty, you
will be prompted to load a new module onto the touch probe and when complete
click on <OK>. Geomet will then drive to the staging position and proceed to
load the module into the assigned bay. The module will then disconnect
from the probe body and proceed
to the staging area of the bay. Note: The touch
probe will not leave the staging area for that bay. Should
the CMM continue moving away from the bay, a false trigger
will occur.
You can then continue to load other bays by repeating the
loading procedure.
Pickup Modules under CMM Control
Select the <Pickup Tip> button followed by a left click on a bay
selection. This will cause the CMM to retrieve the selected module and return to
the staging area. If the touch probe has a module already attached, the CMM will
park that tip before retrieving the selected module.
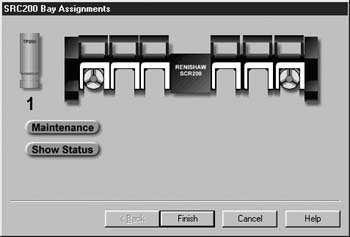
Show Status
The <Show Status> button provides a graphical representation of
the touch probe and bay assignments.
|
 |
|
figure 3, Show status of the Stylus Rack |
|
Caution on
using the Maintenance Modes |
| These modes should be
used with caution. It is primarily designed for the experienced
operator who want to perform maintenance on installed modules such
as cleaning or replacing tips. The assigning of bays from this mode
does not provide any means to qualify the styli or provide access to
motorized probe heads such as the PH9. It is not necessary to use
this mode for populating and qualifying your styli. The Stylus
Manager will handle all operations of assignments and qualifying
your styli. |
Related Procedures:
Stylus Manager,
Choosing a Stylus,
Stylus db Manager,
Stylus Edit Control,
Stylus Rack Setup
|


