|
|
|
|
| |
| |
|
|
|
|
7.01.179 |
|
Geomet 101, 101+, 301, 501 |
| |
|
|
|
|
| |
Command Activation |
| |
| |
|
 |
| Keyboard |
Main Menu |
Toolbar |
|
| |
Definition |
| |
Geomet provides a capture tool that takes a snapshot of
the CAD Graphics area that can be added to a printed
report. The snapshot tool can be viewed and updated on
demand. The snapshot tool creates a Bitmap file that is
linked to the Inspection Feature and time/date stamped
to ensure file integrity. |
| |
Capturing a Graphic Screen Shot |
| |
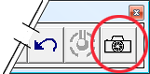
The Screen Shot
access is found only on the Feature Measurement
toolbar. If the toolbar is not currently
displayed, use the
Toolbar
Control to activate it.
Left-click on the Screen Shot button and the
current CAD Graphics view is captured and a
feature is added to the inspection report..
|
 |
|
| |
Viewing the Screen Shot Image |
| |
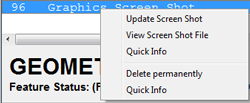
Select the Screen
Shot feature in the inspection report and
right-click to activate the feature menu. Choose
the option "View Screen Shot File".
|
 |
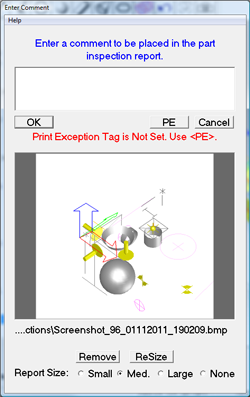
The Screen Shot
Edit Tool is displayed. This is the same tool as
defined in User Prompts.
Adding Text
A Graphics Screen Shot can have text attached to
it. Enter the desired text into the Comment
field. This text will display as part of the
feature name in the inspection report.
Setting Report Size
When printed, the default size of the image is
approximately:
• Small (1.3" High)
• Medium (2" High)
• Large (2.625" High)
|
 |
|
| |
On-Demand Updating the Screen Shot Image |
| |
Select the Screen
Shot feature in the inspection report and
right-click to activate the feature menu. Choose
the option "Update Screen Shot".
You will notice the Screen Shot action of
capturing the image. The original Screen Shot
image file will be updated with the new view.
|
|
|
Another method
available to update the Screen Shot image is to
highlight the feature in the inspection report
and left-click on the Screen Shot button on the
Feature Measurement toolbar.
|
|
|
| |
What happens during an inspection run? |
| |
At run-time,
Geomet executes the Screen Shot feature by
performing an Update ensuring the image is
current.
|
|
|
| |
Setting Screen Shot Defaults |
| |
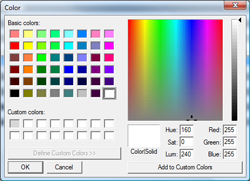
There is only one
System Options setting associated with the Screen Shot
feature. This setting controls the background
color of the CAD graphics color.
Launch the System Options tool using <F9>. Type
"screen" into the Quick Search filter.
|
 |
Launch the color
selection tool by left-clicking on the
"Background color...." listing in the display. A
color selection tool will appear, choose a new
color and press the
 button.
 |
 |
|
|


