
|
|
Re-Qualify with Friction Probe Heads |
|

|

|
|
|
|
| |
|
| |
Definition |
| |
One limitation of using a friction style probe head is
that you can not return to the same articulated position
with any degree of accuracy. Geomet allows the various
positions of the probe head to be used in the part
program without establishing new coordinate systems for
every qualified stylus. This can be accomplished by
following these basic steps.
|
| |
Step 1 |
| |
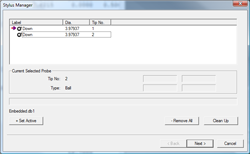
| Assuming we are
starting with no current stylus qualified, we
will qualify the first position for your
inspection using the Stylus Manager as defined
in Qualifying a
Stylus. This will become Stylus Number 1 in
your Probe and Sensor Database. |
 |
|
| |
Step 2 |
| |
Highlight Stylus 1
by highlighting it with a left-click. Actiavte
the Stylus Manager Sub-Menu by right-clicking.
Choose [Duplicate Stylus] from the Sub-Menu.
This new Stylus becomes your working Stylus for
all inspections. |
 |
|
| |
Performing a Inspection |
| |
Start your inspection with Stylus Number 2 as the active
stylus. Do not start your inspection with
Stylus Number 1. Proceed measuring
features until it is required to articulate the probe
position. Reposition the probe and perform a re-qualify,
<Ctrl + w>, on the current stylus number 2.
You will be prompted to capture data points on the
reference sphere. Once this operation has been
completed, you can return to inspecting new features
without any loss of position. This re-qualify step
becomes part of your part inspection and during a
program run, you will be prompted automatically.
This can be done to Stylus Number 2 as many times as
required to compete your inspection. Since Stylus Number
1 was not changed, all styli starting with number 2 and
beyond can be used and re-qualified many times.
Note: This process can also be used when it is necessary to change styli on the probe head. For example, you are required to install a stylus with an extension, or install a small diameter stylus for use on selected features in your inspection. |
| |
Tip: |
| |
When you want to rotate the probe head, or change the
stylus to another size, press the space bar which will
"Disable" the probe preventing data points from entering
Geomet. When you have completed the change, press the
space bar again and your probe will enable. |
| |
Cautions |
| |
Should you have moved Stylus Number 1 and performed a
re-qualify on it, all known locations would have moved.
This includes established Part Coordinate Systems. The
Stylus Database retains the reference sphere location in
the MCS based on stylus number 1. All Part Coordinate
Systems also are referenced to the MCS. Moving stylus
number 1 will cause PCSs to move.
Care should be taken when performing a Re-Qualification
using a manual CMM. The qualification process relies on
the XYZ offset from the CMM
Home position for location of the reference sphere.
That position is assigned to stylus number 1. When you
qualify the first stylus, Geomet retains the location
based on the center of the reference sphere in the
Machine Coordinate System (MCS). The MCS has an origin
point (X=0.0, Y=0.0, Z=0.0) that has been established
either as the power on position for manual CMMs or the
Home position for DCC CMMs. It is possible to have
an established Home position on some manual CMMs that
has that option installed.
Additionally, Re-Qualification assumes the reference
sphere has not been moved. If the reference sphere has
been moved, the Geomet function [Recover→Ref Sphere]
should be done
|
| |
Stylus Manager, Features, Menus and Support Tools |
| |
|
