|
Introduction
the One-Step Motion Edit tool provides a access to adjust motion parameters and motion
path position on a feature with one operation.
Activating
To activate the One-Step Motion Edit tool, highlight the feature in the report and
bring up the feature sub-menu by right-clicking, see figure 1.
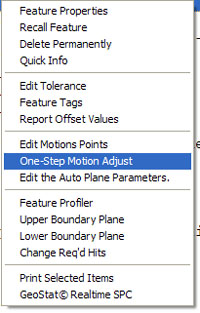 |
| figure 1, One-Step Activation |
The One-Step Motion Edit tool will appear as long as there is motion path entries for
the selected feature, see figures 2 and 3.
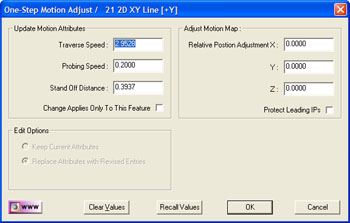 |
| figure 2, One-Step Motion Edit tool |
|
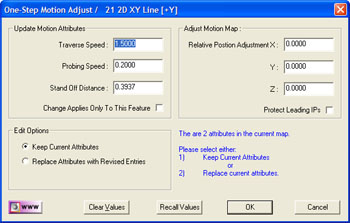 |
| figure 3, Editing a Motion Path with attributes |
The motion map may contain previously defined attribute records. If the
One-Step Motion Tool identifies that attribute records exist, you will be
prompted to choose how the edit tool should handle them. In most cases, it
is advisable to let the edit tool override all attribute records.
<Clear Values>
This command will clear the XYZ values in the Adjust Motion Map Group.
<Recall Values>
The One-Step Edit Tool retains the last used XYZ offset values in the
Windows Registry. When you press <Recall Values> those values are retrieved
from the registry and entered into the edit controls
Attribute Changes
The One-Step tool can adjust the motion attributes, Traverse Speed, Probing Speed and
Stand Off Distances.
Traverse and Probing Speeds. When a change is made to one of these
values, a Attribute record is inserted as the first record in the motion map. When the
feature is executed, these new values will be used for this feature and all features
following until another Attribute record is found.
If you require only to make the change for this one feature, place a check next to
"Change Applies Only To This Feature". The One-Step tool will
place a attribute at the head of the record and append a attribute record to the motion
path returning it to the original attribute values. The changes will then only act upon
the selected feature.
Stand Off Distance Change. When a new distance is entered, the
One-Step tool will adjust all SO-MP-SO relationships. When you build the motion map the
first time, the current stand off distance established in DCC Settings will be used to
calculate the distance between the SO and MP and the return SO. Using this feature allows
you to update all SO-MP-SO triplets with a new value. For example, if you taught the
motion path with a standoff of 0.200", you can change that distance to 0.100"
with this feature. There exists one rule when using this tool, the MP must be bracketed by
a leading SO and followed by a SO.
Activating the One-Step tool on a motion path that already contains Attributes within
the map, a warning will be shown, see figure 3. You have the choice to keep the
current attributes in the motion path, or replace them with a new attribute at the start
of the motion path as described above.
Adjust Motion Map
Under this section you can move the entire motion path by entering a relative value for
X,Y and Z. For example; should you be required to move your motion path for a circle along
the X axis -0.050", enter in the X edit control -0.050. When you press the
<Ok>
button, all motion will be offset in the X direction -0.050".
There are times you would not want to adjust the leading IPs. For example, the leading
IPs might start in a circle feature and executing through the IPs traverse to the next
feature. If you perform a relative move on the entire motion path, the leading IPs would
also be adjusted and may lead to an improper path navigating from one feature to the next.
To prevent this relative adjustment on the leading IPs, place a check next to "Protect
Leading IPs".
|


